
GV 900 SV/1 - VCR GRUNDIG - Free user manual and instructions
Find the device manual for free GV 900 SV/1 GRUNDIG in PDF.

| Product Type | VCR |
| Brand | GRUNDIG |
| Model | GV 900 SV/1 |
| Video Format | VHS |
| TV Standard | PAL / SECAM |
| Number of Video Heads | 4 heads |
| Loading Type | Front Loading |
| Video Inputs | SCART, Composite (RCA) |
| Video Outputs | SCART, Composite (RCA) |
| Audio Inputs | SCART, RCA (left/right) |
| Audio Outputs | SCART, RCA (left/right) |
| Recording Timer | Programmable (up to 8 programs) |
| Special Functions | Auto Stop, Quick Search, Still Frame |
| Remote Control | Included (infrared) |
| Power Supply | 220-240 V, 50 Hz |
| Power Consumption | Approximately 20 W (standby < 5 W) |
| Dimensions (W × H × D) | 430 × 95 × 250 mm |
| Weight | Approximately 4 kg |
| Operating Temperature | 5 °C to 40 °C |
| Operating Humidity | 20 % to 80 % (non-condensing) |
| Maintenance | Clean heads with a VHS cleaning cassette |
| Safety | Unplug before cleaning; avoid moisture |
| Spare Parts / Repairability | Available from authorized Grundig dealers |
Frequently Asked Questions - GV 900 SV/1 GRUNDIG
User questions about GV 900 SV/1 GRUNDIG
0 question about this device. Answer the ones you know or ask your own.
Ask a new question about this device
Download the instructions for your VCR in PDF format for free! Find your manual GV 900 SV/1 - GRUNDIG and take your electronic device back in hand. On this page are published all the documents necessary for the use of your device. GV 900 SV/1 by GRUNDIG.
USER MANUAL GV 900 SV/1 GRUNDIG
Videorecorder GV 900 SV/1
Special features of your video recorder Contents of delivery
Installation and Safety
At a Glance
Front side of the video recorder Rear side of the video recorder The remote control
Connecting and Preparation
Connecting the aerial, TV set, satellite receiver, and mains cable Switching the video recorder on and off (energy-saver mode) Inserting batteries into the remote control
Settings
Adjusting the TV set to the video recorder Channel programming with the automatic tuning system ATS euro plus
Playback
Basic playback functions Additional playback functions Index search
Recording
The three recording options
The video programme system (VPS/PDC)
Instant recording
Assembling recordings with clean joints
Selecting the audio track
Locating certain recordings using the Video Index Search System (VISS)
Programmed recording - by entering the ShowView number
Programmed recording- by entering the data for the desired TV programme
Checking, altering and clearing programmed recording data.
Interrupting the recording standby mode of the video recorder
Re-activating the recording standby mode of the video recorder
Copying
from a second video recorder or a DVD player
Operation with a Satellite Receiver
Operation with a Decoder
31
Special Settings
Re-sorting TV channels manually
Clearing TV channels from the station table
Changing or entering station names
Channel programming with the manual tuning system or by entering the channel numbers manually
Skipping TV channels
35
Setting the Time and Date
Updating the time and date automatically
Setting the time and date manually
36
Special Functions
Selecting the MODE* menu
On-screen display on/off
Continuous playback
Selecting the video recorder's control address
Child lock
38
Remote Control of TV Sets
39
Fixing Faults Yourself
40
Technical Data
41
Help in the Case of a Defect
Grundig After-Sales Points
Special features of your video recorder
Three recording options
- Instant recording, i.e. you select the desired programme on the video recorder and start recording immediately.
- Programmed recording at a later date with the help of the ShowView numbers.
- Programmed recording at a later date by entering the data for the desired programme if you do not know the ShowView numbers.
High-speed drive
With this high-speed drive the fast rewind time of, for example, of an E-180 cassette is reduced to about 72 seconds.
GRUNDIG Megalogic
Three Megalogic options are available:
- Transfer of the TV channels to the recorder in the order programmed on the TV set.
- Automatic selection of the AV programme position on the TV set when starting playback on the video recorder.
- Instant recording of the currently running TV programme when starting recording on the video recorder.
ShowView recording
Really easy programming of recordings. Select the desired programme from your TV guide, enter the ShowView number indicated there, ready.
SAT video control
Socket for the timer control of a Grundig satellite receiver connected.
Contents of delivery
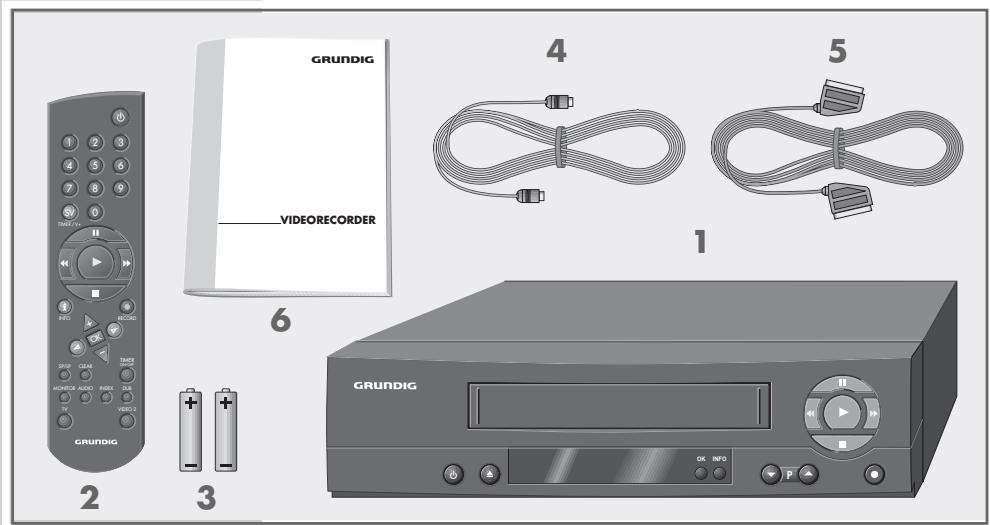
Video recorder GV 900 SV/1
2 Remote control
3 2 batteries 1.5V- Mignon type
4 RF (aerial) connection cable
5 EURO-AV cable
6 User manual


In order that you may enjoy this high-quality and comfortable video recorder for a long time it is very important that you observe the following points when installing the recorder.
This video recorder is intended for the reception, recording and reproduction of TV picture and sound signals.
Any other application is expressly prohibited.
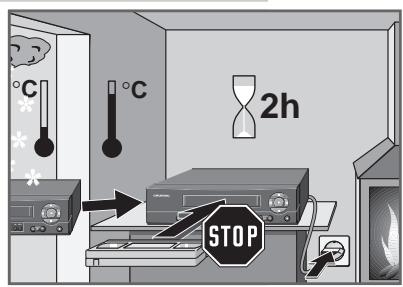
If the recorder is exposed to drastic temperature changes, for example when taking it from a cold to a warm place, connect the recorder to the mains supply and let it stand at the new place for at least two hours without a cassette loaded. The recorder is intended for use in dry rooms. If you wish to operate it in the open air, make absolutely sure that it is protected against moisture (rain, splashes of water). Do not expose the recorder or the cassette to any moisture.
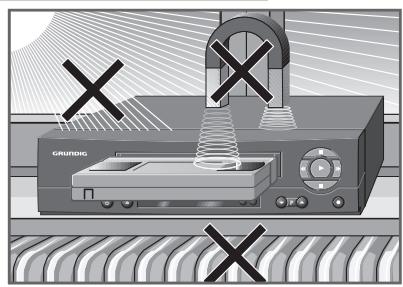
Place the recorder on a flat and hard surface. Do not place any objects (e.g. newspapers) on the recorder and no tablecloth or similar below the recorder.
Do not place the recorder in the immediate vicinity of a heat source or in direct sunlight as this would prevent appropriate cooling. Keep the recorder away from magnetic fields (e.g. loudspeakers).
Never insert any foreign objects into the cassette compartment. This might damage the high-value mechanism.
Never open the recorder. Damage caused by unqualified work is not covered by the manufacturer's guarantee.
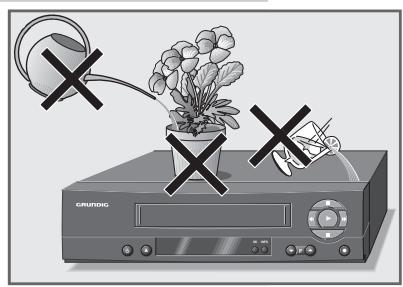
Do not place any object filled with water (vases and similar) on the recorder. The object might fall over and the liquid spilling into the unit would impair its electrical safety.
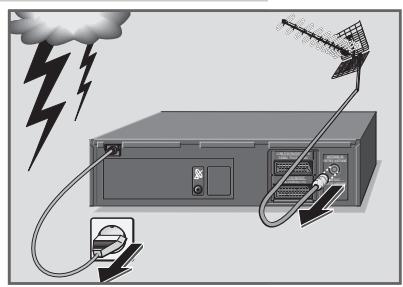
Thunderstorms are a danger for any electrical appliance. Even when switched off, the recorder might be damaged by lightning striking the mains supply and/or the aerial lead. During a thunderstorm you must always disconnect the mains and aerial plugs.
For this video recorder, technology and ecology form a convincing overall idea. Only ecologically high-grade materials are used. The packing consist of almost 100% recycled paper, its plastic parts have been reduced to a minimum. The batteries supplied are free of mercury and cadmium. For environmental reasons no buffer battery is used. To enable a high-grade recycling after use, the number of plastic parts has consequently been reduced. All large plastic parts are marked. To facilitate service and for optimum recycling, this device has been designed in a specially disassembly-friendly and recycling-friendly way.
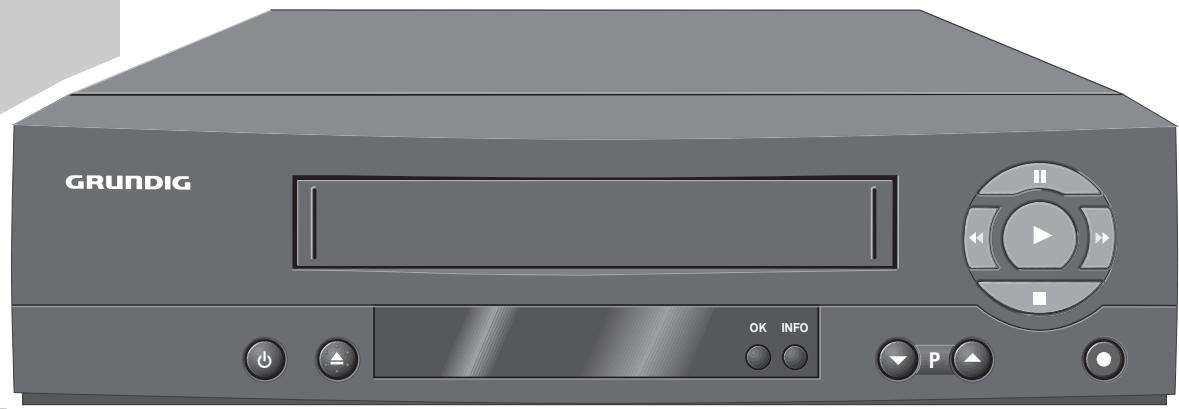
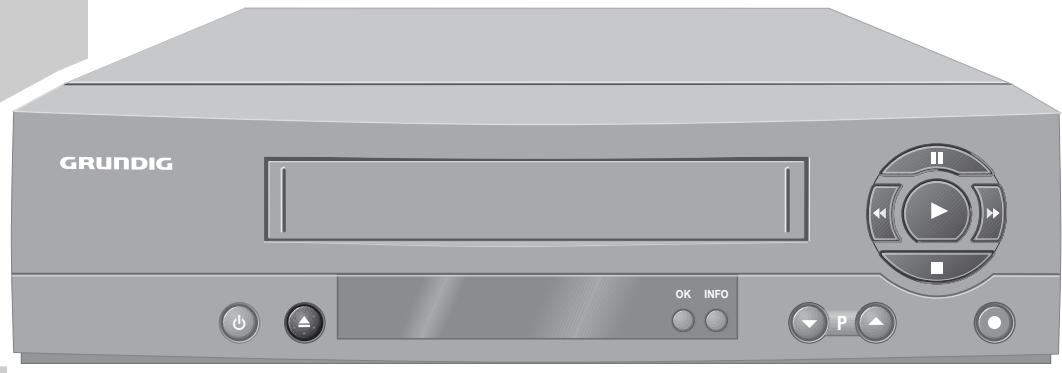
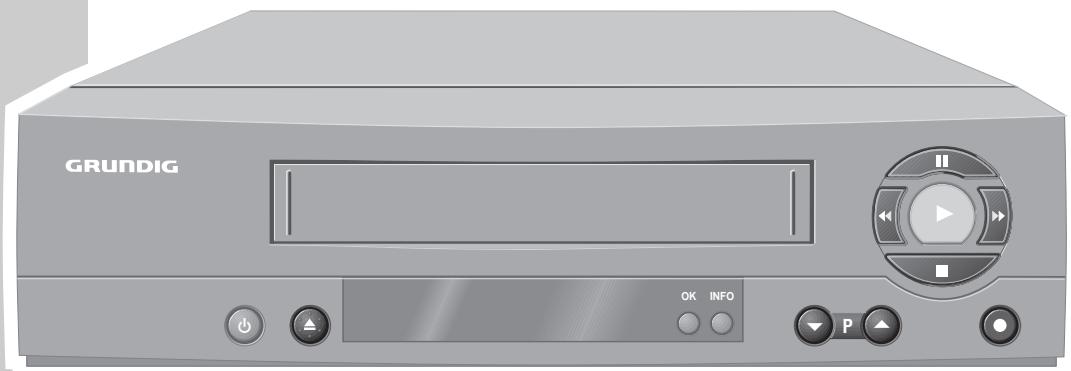
Front side of the video recorder
Switches the video recorder off.
Ejects the cassette.
OK Calls up data, confirms and saves settings.
INFO Displays the menu, switches back to the TV picture.
P Selects programmes downwards.
P Selects programmes upwards.
Starts recording.
During playback: reverse picture search; after stop: fast rewind.
Pause during recording, freeze-frame during playback.
Starts playback.
During playback: forward picture search; after stop: fast forward wind.
Switches the video recorder on; ends all tape mechanism functions.
Rear side of the video recorder
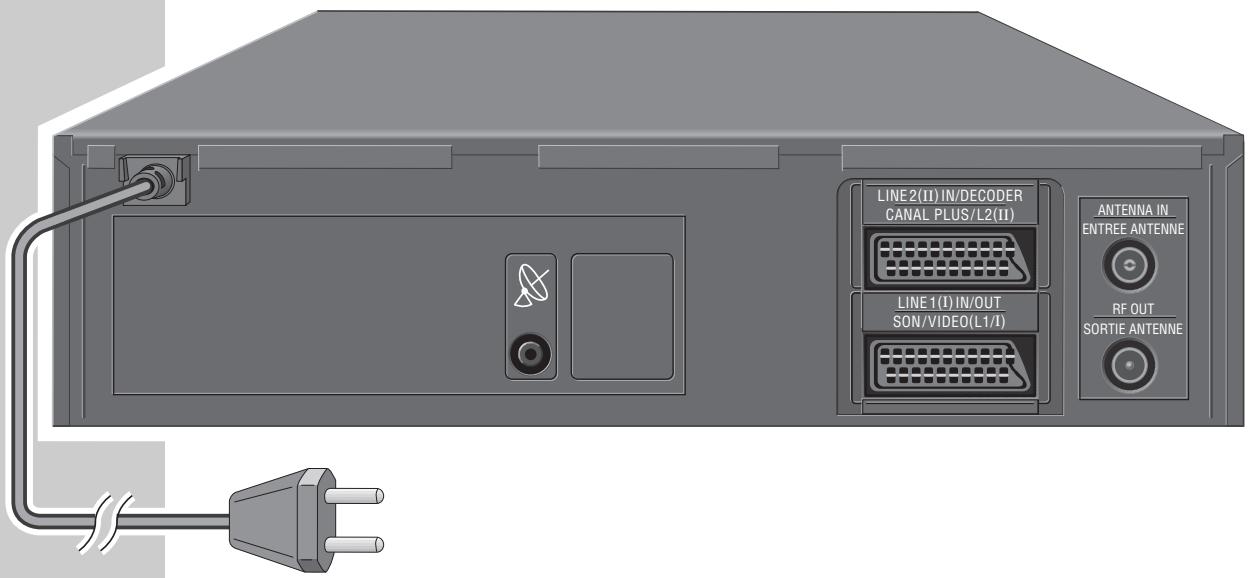

Mains cable to mains supply socket.

SAT control socket for satellite receiver.
LINE 2 (II) IN/DECODER
Euro/AV connector for external device.
LINE 1 (I) IN/OUT
Euro/AV connector for TV set.
ANTENNA IN
Input socket for domestic aerial.
RF OUT
RF output socket for aerial cable connection with TV set.
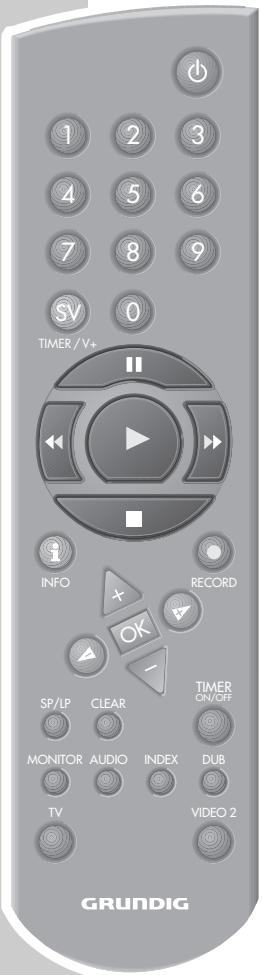
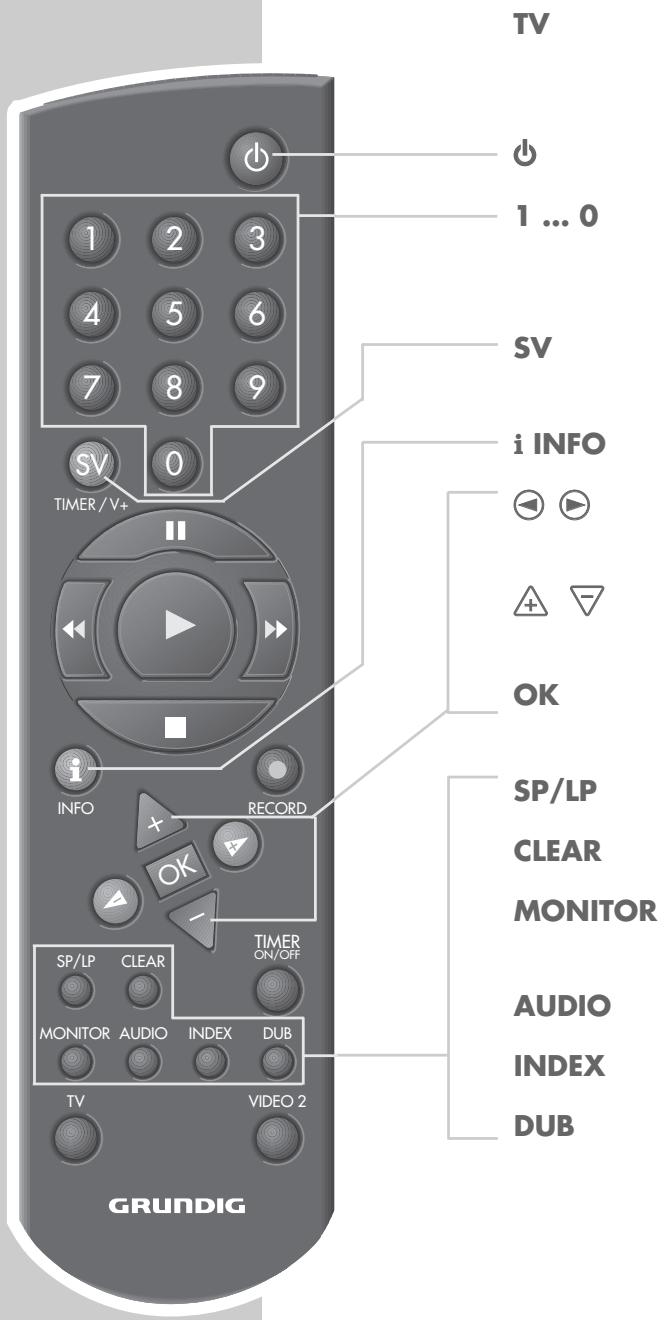
The remote control
On this page you will find a brief description of the important remote control functions. Refer to the corresponding chapters of this manual for more information on operation.
Direct the remote control at the video recorder.
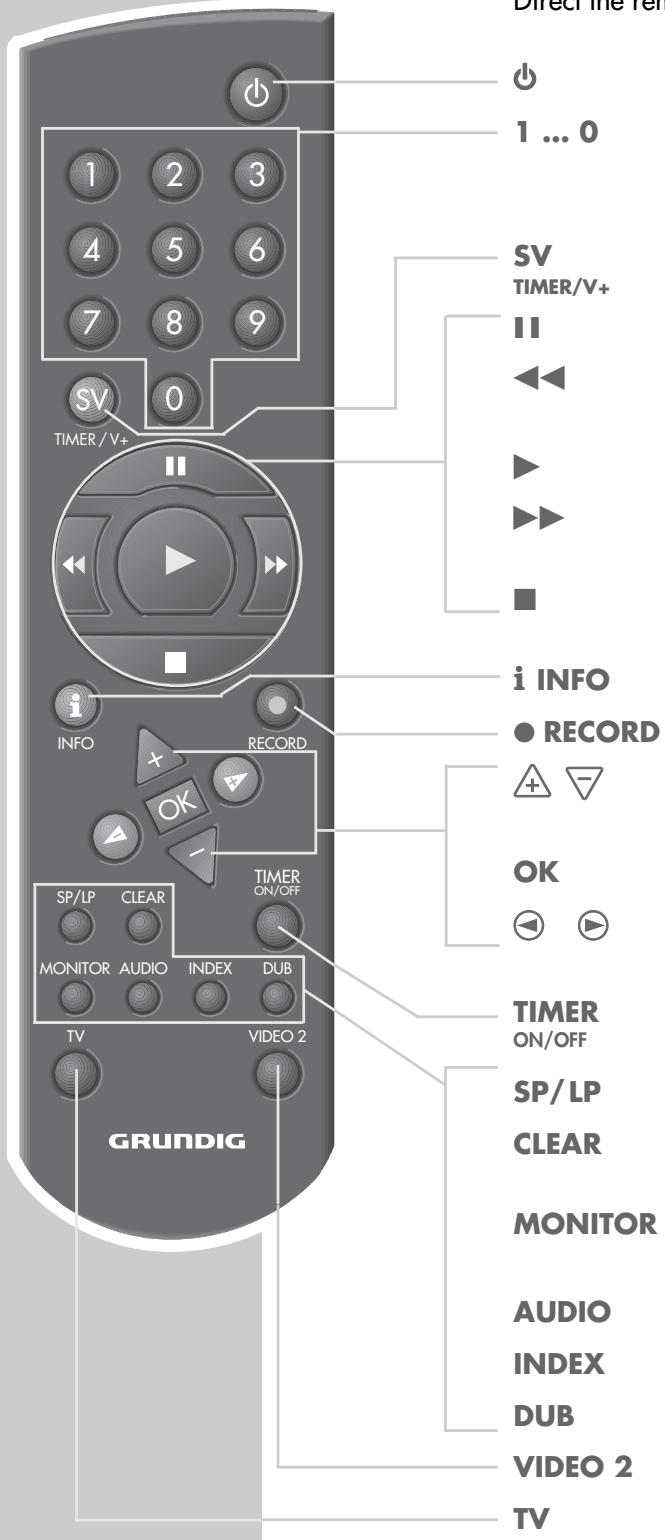
Switches the video recorder off (standby).
Numeric buttons for various entries, the 0 button selects the R1 , R2 programme positions.
Initiates programmed recording with ShowView.
Pause in recording mode, freeze-frame in playback mode.
Reverse picture search during playback, fast rewind after stop.
Starts playback.
Forward picture search during playback, fast forward after stop.
Switches the video recorder on; ends all tape mechanism functions and switches the video recorder to stop.
Switches to the menu and back to the TV picture.
Starts recording.
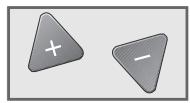
Select channels, + up, - down; select various functions in the menus.
Calls up, confirms and stores data.
Finetuning; select various functions in the menus.
Activates and de-activates programmed recording.
No function.
Clears data, activates entries, resets the playing time display to 0:00:00
Switches the picture screen between TV picture and video recorder picture (monitor mode).
No function.
Activates the INDEX search function.
No function.
Switches to the video control address 2.
Switches to TV control mode.
See page 38 for the possible functions.
Notes:
If the TV set is equipped with the Megalogic function, the video recorder and the TV set must be connected via the EURO-AV cable supplied, see point 3.
If you wish to connect a satellite receiver equipped with a SAT control socket to the video recorder, this must be done before carrying out the settings. Start with step 2 of the example.
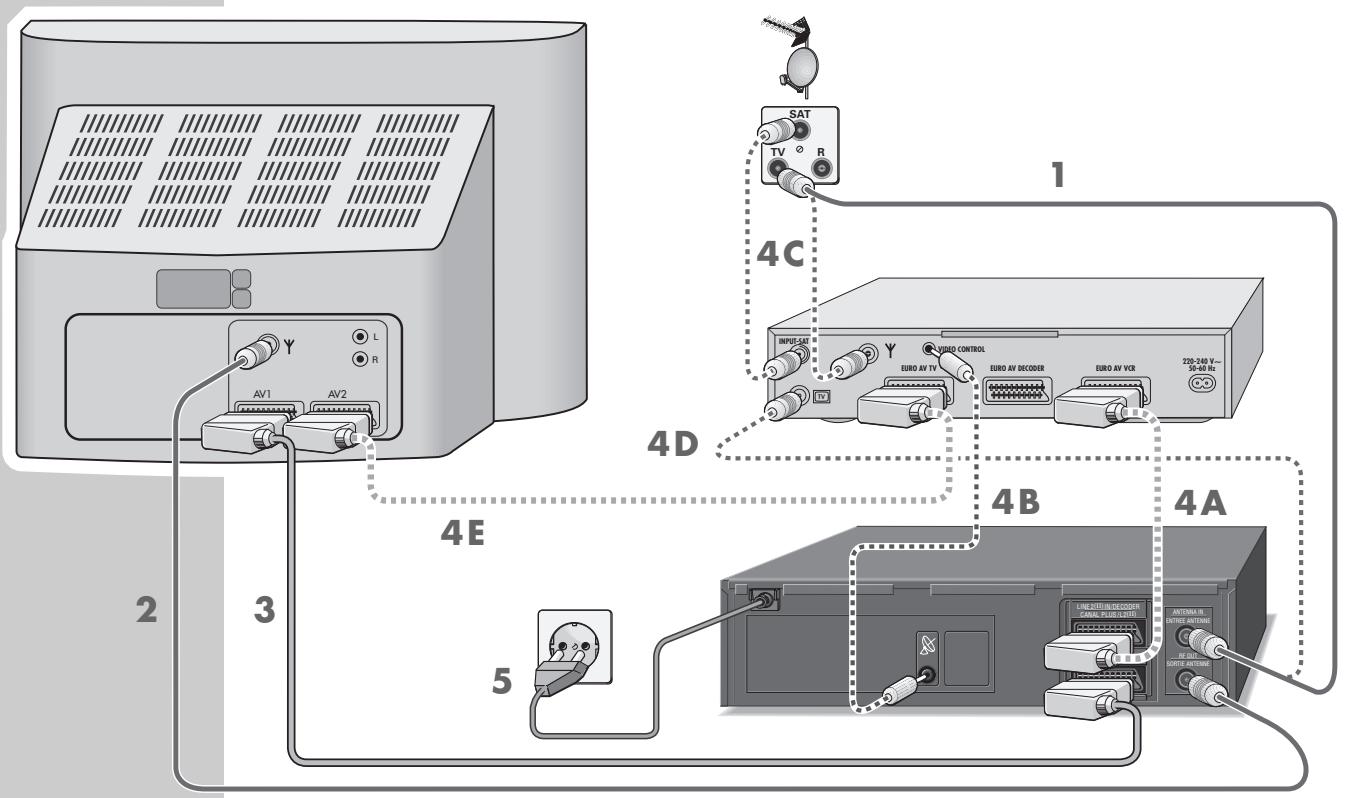
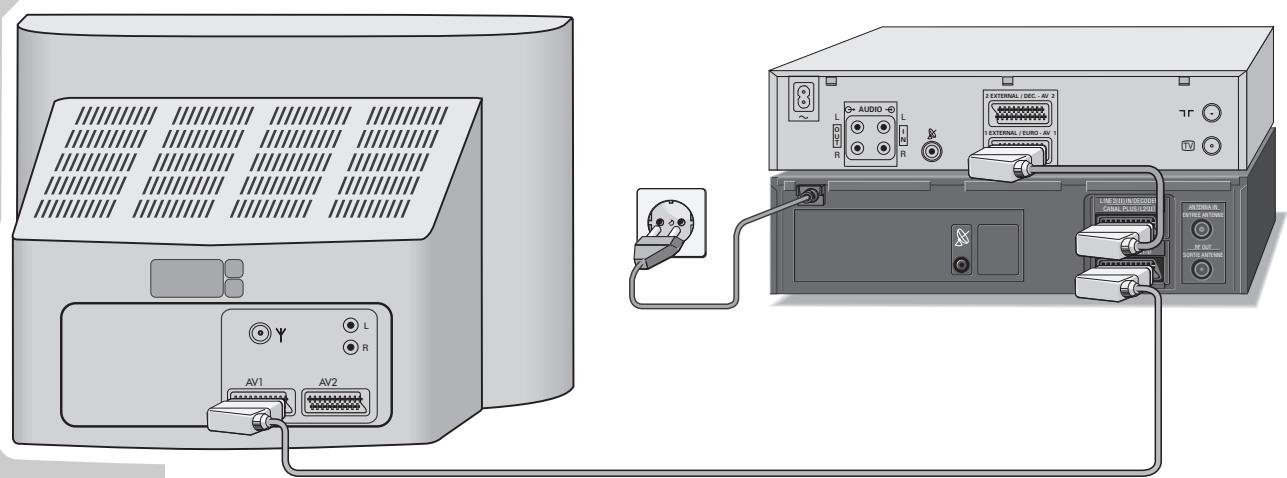
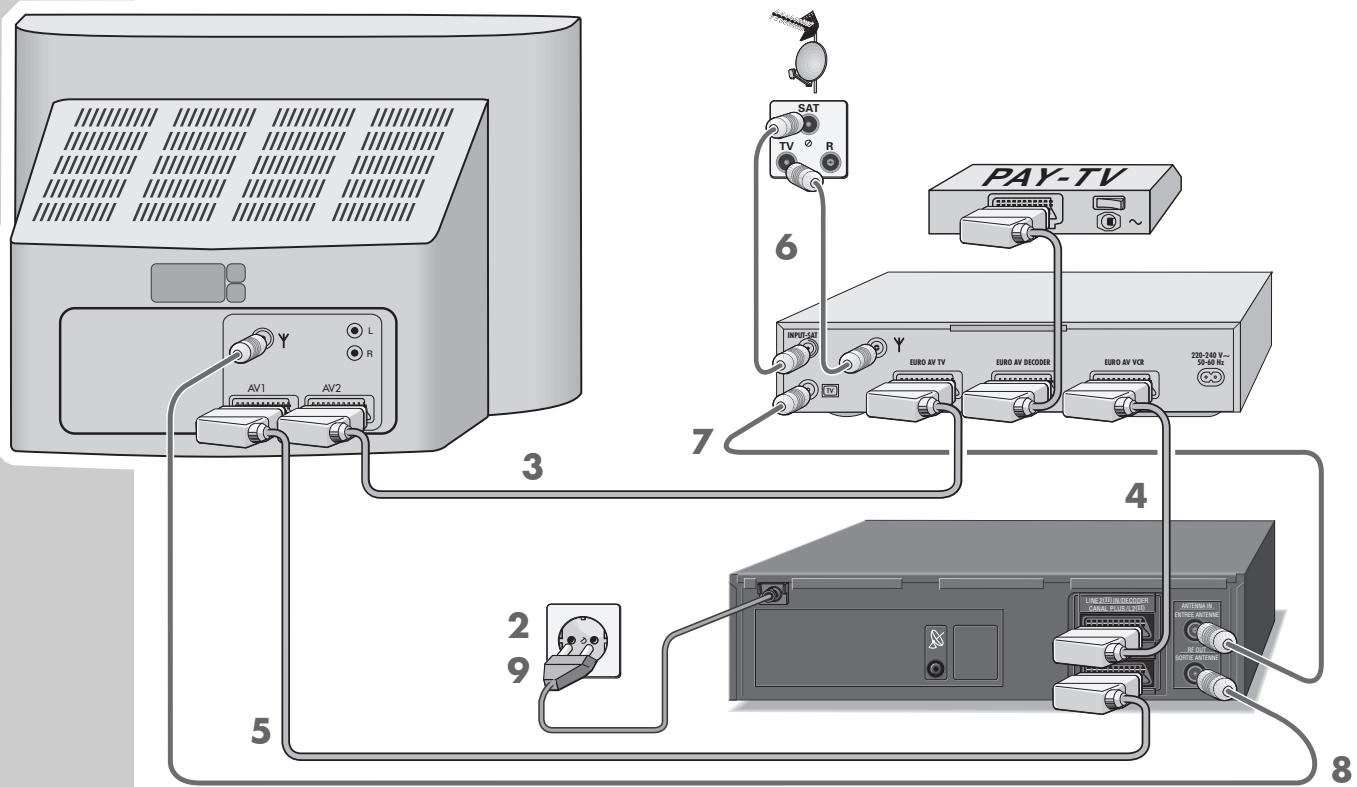
Connecting the aerial, TV set, satellite receiver and mains cable
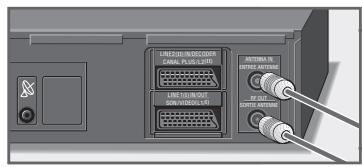
1 Connect the aerial cable from the domestic aerial with the aerial socket «ANTENNA IN« of the video recorder.
2 Connect the aerial cable supplied with the RF OUT socket of the video recorder and the aerial socket of the TV set.
3 If the TV set is equipped with one or several EURO-AV sockets: connect the EURO-AV cable supplied with the «LINE1(I)IN/OUT« socket of the video recorder and the AV 1 socket of the TV set. - The advantage of this connection is a better picture and sound quality during playback.
4 If a satellite receiver equipped with a SAT control socket is connected to the video recorder:
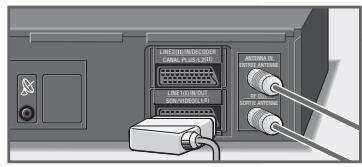
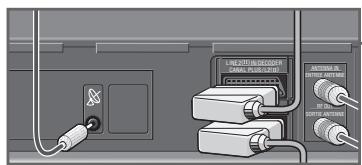
connect the «LINE 2 (II) IN/DECODER« socket of the video recorder and the VCR socket of the satellite receiver via a commercially available EURO-AV cable (connection 4A).
Connect the « socket of the video recorder and the «VIDEO CONTROL« socket (control line) of the satellite receiver via a commercially available Cinch cable (connection 4B).
Connect the domestic aerial with the (Y) aerial socket of the satellite receiver.
Connect the aerial cable from the satellite aerial with the corresponding aerial socket (INPUT-SAT) of the satellite receiver (connection 4C).
Connect the «ANTENNA IN« socket of the video recorder with the corresponding socket (TV) of the satellite receiver via a commercially available aerial cable (connection 4D).
Connect the EURO-AV socket (TV) of the satellite receiver with the AV2 socket of the TV set via a commercially available EURO-AV cable (connection 4E).
Note:
It is possible to connect alternately a PAY-TV decoder to the «LINE 2 (II) IN/DECODER« socket.
If a satellite receiver is already connected to this socket, use the decoder socket on the satellite receiver for the connection of the decoder.

5 Connect the mains cable with the mains supply socket.
- The video recorder is now in standby.
Attention:
The video recorder is isolated from the mains only when the mains cable is disconnected from the mains supply socket.
Switching the video recorder on and off (energy-saver mode)
1 Switch the video recorder on with the button.
2 Switch the video recorder to standby with the button.
- The video recorder is now in standby and the time is visible in the display.
3 Switch off with the button.
- The video recorder is now switched off and the time indication goes out. The power consumption falls below 2 W.
Note:
The video recorder cannot be switched off if recordings are programmed.
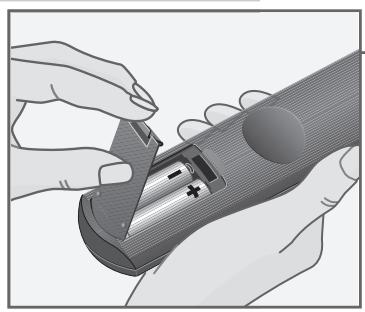
Inserting batteries into the remote control
Press the catch and remove the cover from the battery compartment.
2 Insert the batteries (Mignon type, e.g. UM-3 or AA, 2 × 1.5V ). Observe the polarity marks on the bottom of the battery compartment.
Note:
If your recorder no longer responds correctly to the remote control commands, the batteries may be exhausted. Exhausted batteries must be removed.
The manufacturer cannot be held responsible for damage resulting from battery leakage.
Environmental protection
The remote control batteries, even those containing no heavy metals, do not belong in the household waste. Used batteries can be disposed of for recycling at most specialized dealers without paying a fee.
Adjusting the TV set to the video recorder
This adjustment is not necessary if the video recorder and the TV set are connected with a EURO-AV cable.
Preparation
Switch the TV set on.
Select the AV^ programme position for video playback via the aerial socket.
Consult also the user manual of your TV set.
Note:
The video recorder must be in standby mode (not in the energy-saver mode).
Adjustment
1 On the TV set in the UHF range between channel 21 and channel 69, search for a "free" channel on which no TV programme is received (only picture and sound noise).
- Many TV sets display the channel number.
2 Store the "free" channel number on the TV set.
- For this consult the user manual of the TV set.
3 Press and hold down for about three seconds the «INFO « button on the video recorder.
- CH 36 RF, for example, is displayed on the video recorder.
4 Using the P buttons, tune through the channels on the video recorder until the picture from the recorder appears on the picture screen of the TV set.
5 If the picture quality of the "recorder picture" is good, store the setting with the OK button.
- The video recorder switches to standby.
Note:
If the quality of the "recorder picture" is poor, or the picture quality of one or more TV programmes on the TV set gets worse, you must search a different "free" channel on the TV set. For this, repeat the steps 1 to 5.
Channel programming with the automatic tuning system ATS euro plus
The recorder has a built-in receiver. It can therefore receive and record television programmes independently of the TV set.
For this, you must programme the TV channels on the video recorder.
When carrying out this function, the time is automatically updated, provided a TV programme with teletext is received on programme position 1.
If the time has not been set automatically, it must be set manually as described in the chapter "Setting the Time and Date" on page 35.
84 programme positions are available which can be assigned as desired to TV channels received via the aerial, the cable system or a satellite receiver.
If a TV set equipped with the Megalogic functions is connected to the video recorder, the TV channels programmed on the TV set are automatically transferred to the video recorder when carrying out channel programming.
If a satellite receiver equipped with a SAT control socket is connected to the video recorder, the channels programmed on the satellite receiver are transferred to the station table of the video recorder.
Preparation
Switch the TV set on.
Select the AV < programme position for video playback on the TV set.
Programming
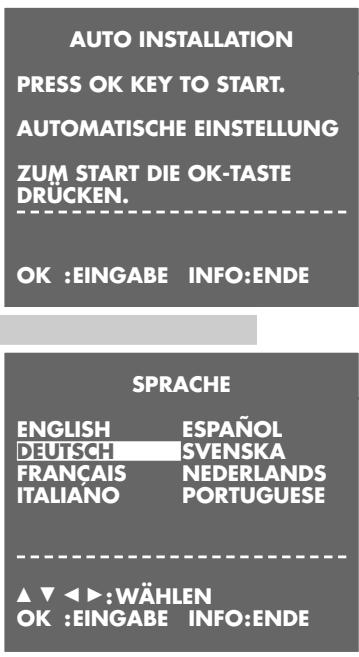
Press the button.
- The »AUTO INSTALLATION« table appears on the picture screen of the TV set.
Help:
If the AUTO INSTALLATION« table does not appear, press the and INFO« buttons on the video recorder at the same time until the table appears.
2 Initiate programming with the OK button.
- The SPRACHE« (LANGUAGE) table appears on the picture screen.
3 Use the buttons to select the desired language then confirm with the OK button.
- The »COUNTRY« table appears on the picture screen.
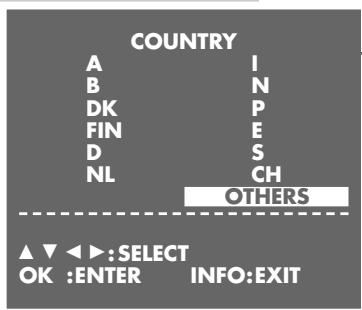
4 Select the country (place of installation) using the buttons. If the country you require is not given in the table, select the OTHERS line. Confirm your selection with the OK button.
5 A table asking you whether the aerial cable or the EURO-AV cable has been connected to the video recorder appears. Press OK to go to the next setting.
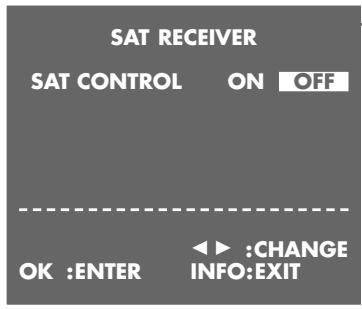
6 The SAT RECEIVER table appears on the picture screen. If no satellite receiver equipped with a SAT control socket is connected to the video recorder, select the SAT CONTROL OFF setting using the or button then continue with step 7. If a satellite receiver equipped with a SAT control socket is connected, use the or button to select the SAT CONTROL ON setting. - A table asking you to connect the satellite to the video recorder appears on the picture screen.
7 Press the OK button to start the automatic tuning system.
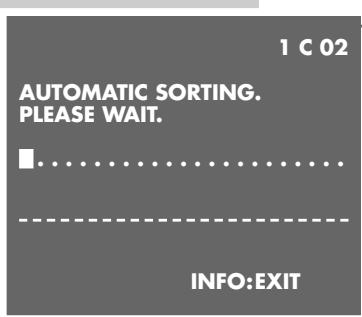
- The recorder searches all channel numbers for TV stations, then sorts and stores them. This can take several minutes.
- When the search is completed, the table MOVE appears on the picture screen.
Note: You can sort the found TV channels to suit your taste. If the order of the TV channels is already to your taste, continue with step 10.
8 Use the 47 忍 « buttons to select the channel you wish to move then mark it with the » OK « button.
9 Use the buttons to move the marked channel to the desired programme position then confirm with the OK button. If you wish to sort further TV channels, repeat the steps 8 and 9.
10 End the setting with the i INFO button.
Note:
Further settings such as manual channel search, changing the order of the channels at a later date, clearing TV channels from the station table, or assigning station names are described from page 31.
Basic playback functions
Preparation
Switch the TV set on.
Select the AV^ programme position for video playback on the TV set.
Insert a recorded cassette with its window up into the cassette compartment until it is automatically pulled in.
- The cassette symbol « appears in the display of the recorder.
1 Start playback with the button.
- The tape length indication and briefly after this the remaining playing time indication appear on the picture screen.
Note:
If the video recorder is connected to a TV set equipped with the Megalogic functions, the TV set switches on from standby and selects the «AV« programme position automatically after starting playback.
2 Use the button to switch to *Freeze-frame/Pause.
Press repeatedly to advance the freeze-frame step by step.
3 Press the button during playback to select the reverse picture search function.
Press the button during playback to select the forward picture search function.
Press repeatedly to select different playback speeds.
4 End playback with the »■« button.
5 Select fast rewind with the fast forward wind with the button.
6 Press the button on the video recorder to eject the cassette.
Notes:
If a cassette which is not erase-protected is inserted into the video recorder, plaback is started automatically.
You can change the video recorder's display mode with the OK button: tape length, remaining playing time (R), and time of day.
Pressing the CLEAR button resets the tape length indication to 0:00:00
- Freeze-frame picture with disturbance lines.
Additional playback functions
Double playback speed
Press the button during playback.
2 Press the button once again to return to normal playback.
Slow motion


1 During freeze-frame (playback-pause): press the button a longer time. - Brief display on the video recorder: SLOW
2 Press the button to return to normal playback.


Advancing freeze-frames step by step
1 During freeze-frame (playback-pause): repeatedly press the button. - Brief display on the video recorder: STILL
2 Press the button to return to normal playback.
Improving the picture of a freeze-frame
If the picture jitters or appears uneven during the freeze-frame function, it can be optimized:

1 During the freeze-frame function (playback-pause), use the or button to adjust the picture to suit your personal taste.
2 Press the button to return to normal playback.
Correcting picture interference (track adjustment)
1 During playback, use the or button to adjust the picture to suit your personal taste.
- This setting is maintained until the cassette is removed.
2 If you press the P « buttons on the video recorder at the same time, the AUTOTTRACKING function is activated.
Automatic picture improvement (ACC Plus)
"Cassettes recorded on another video recorder may have a poor picture and/or sound quality. This is not a fault of your recorder!"

Press the OK button on the video recorder during playback. The automatic picture improvement function (ACC Plus) optimizes the picture.
Note:
The freeze-frame and picture search functions are automatically switched off after a certain time.
Playing back NTSC colour recordings
When playing back NTSC recordings, the recorder switches automatically to this system.
Note:
During NTSC playback, no freeze-frame function is possible.
Index search
This search system enables the automatic return to the tape position 0:00:00
Preparation
Switch the TV set on.
Select the AV^ programme position for video playback on the TV set.
Insert the desired cassette.
Control
1 Start playback with the button.
2 Select the tape indication with the OK button.
3 At the desired tape position, press the CLEAR button to reset the tape indication to 0:00:00
4 To return to the marked tape position, press the INDEX button and then the 0 button.
- The tape is rewound to the marked position (index).
The three recording options
With your video recorder you may record programmes in three different ways:
1 Right away, that is you select the desired programme on the video recorder then start recording.
2 At a later time using the ShowView number.
3 At a later time by entering the data of the desired TV programme if you do not know the ShowView numbers.
For the recording modes 2 and 3, you can enter the recording data for eight different broadcasts over a period of one year or for dayly or weekly recordings at the same time. Your favourite broadcasts will automatically be recorded via the Video Programme System (VPS) which is controlled by the TV broadcasters.
The video programme system (VPS/PDC)
If your programmed recordings are controlled via this system, the desired programme will always completely be recorded.
Notes on the video programme system
Many TV stations broadcast an additional programme-related (VPS/PDC) signal which indicates the start and duration of each individual TV programme. It is therefore important when programming the recorder to enter the switch-on and switch-off times to the exact minute.
If TV programmes are altered or moved, special VPS/PDC times are indicated in the programme guides. They must be entered instead of the normal starting times.
TV programmes without VPS/PDC signal
With TV stations that do not transmit a VPS/PDC signal, recording is only started by the switch-on time and only ended by the switch-off time.
This does not depend on whether the VPS/PDC signal is confirmed or cleared when programming recordings.
Programming several TV programmes on one day
If you wish to record several TV programmes on one day, you must decide which one is to be recorded completely if there is a risk of alterations to timing.
TV programmes from a satellite receiver with aerial positioner
When programming recordings of TV programmes from different satellites, the VPS signal is to be programmed for one aerial position only as otherwise the motor of the aerial positioner could be overloaded.
Instant recording
Preparation
Switch the TV set on.
Select the AV programme position for video playback on the TV set.
Insert a cassette with sufficient playing time and intact erase tab (cassette not erase-protected) into the cassette compartment until it is fully pulled in.
- The cassette symbol « appears in the recorder's display.

Control
Before starting recording, select the desired channel with the or P 0...9 buttons.
Note:
If a TV set equipped with the Megalogic functions is connected to the recorder, the TV programme currently visible on the picture screen can be recorded by pressing the RECORD button. In this case it is not necessary to select the programme position on the video recorder.
2 Start recording by a longer pressure on the RECORD button. Press repeatedly to enter a switch-off time in steps of 10 minutes.
3 Select recording-pause with the 11 button.
4 End the recording with the button.
5 Fast rewind with the fast forward wind with the button.
6 Press the button on the video recorder to eject the cassette.
Note:
The tape length indicator can be set to 0:00:00 by pressing the CLEAR button.
Assembling recordings with clean joints
With this function you will have no disturbing transitions between the individual recordings during playback.
1 During playback, locate the end of the picture scene at which you wish to join the new recording. Press the button at this tape position.
2 Switch the recorder to recording-pause using the RECORD button.
3 Enter the desired programme position number with one or two digits using the «0 … 9« buttons then start the new recording with the «RECORD« button.
4 End the recording with the button.
Locating certain recordings using the Video Index Search System (VISS)
With this system you may find the beginning of every recording in a precise and fast way. The "marks" required for this are automatically placed at the beginning of each recording.
Preparation
Switch the TV set on.
Select the AV programme position for video playback on the TV set.
Insert a cassette.
Control
1 Press the INDEX button.
2 Repeatedly press the or button to enter the index number of the desired recording (max. 19).
- The tape is wound to the selected recording and playback is started there.
Programmed recording - by entering the ShowView number
Notes:
The time and date must correctly be set on the recorder.
The ShowView numbers of the different broadcasts can be found in TV programme guides.
If all programmed recording positions (TIMER positions) are occupied, you must clear one position, refer to "Clearing programmed recording data" on page 26.
Programming can be aborted at any time by pressing the button.
SHOWVIEW® is a trademark of Gemstar Development Corporation.
SHOWVIEW is manufactured under licence from Gemstar Development
Corporation.
Preparation
Switch the TV set on.
Select the AV^ programme position for video playback on the TV set.
Insert a cassette with sufficient playing time and intact erase tab (cassette not erase-protected) into the cassette compartment until it is fully pulled in.
If a cassette is already inserted, switch on with the button.
If the recorder is in recording standby mode, de-activate this mode with the TIMER ON/OFF « button.
Example
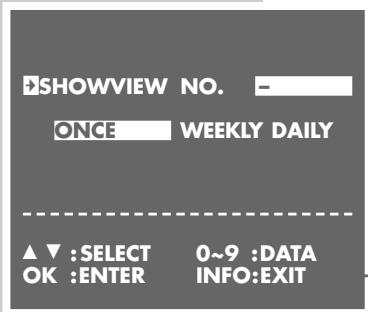
1 Start programming with the TIMER SV « button.
- The SHOWVIEW table appears on the picture screen.
2 Enter the ShowView number of the desired TV programme using the
0...9<buttons.
Note:
If incorrect entries are made, the ShowView number can be cleared digit by digit with the CLEAR button.
If the programme is to be recorded daily or weekly at the same time, use the button to select the ONCE WEEKLY DAILY line then select the desired function with the or button.
The "daily" function cannot be used for recordings on Saturday or Sunday.
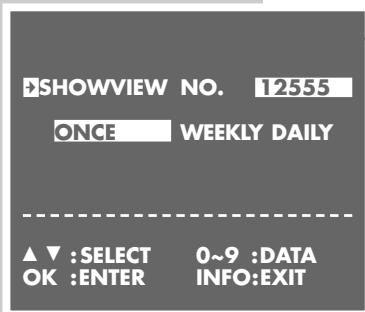
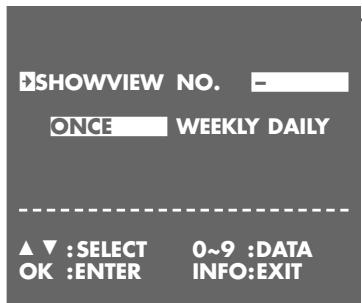
3 Confirm the ShowView number with the OK< button. - The current recording data appears on the picture screen.
Note:
When first programming a TV programme, PR is marked in the table. The recorder first must "learn" on which programme positions the individual TV channels are stored.
Enter the number of the desired programme position (e.g. 03 ) with two digits using the 0 9 buttons.
This setting does not have to be repeated for any further programmed recordings from this programme position.
If you programme a recording from a satellite receiver not equipped with a SAT control socket, select the programme position A2 using the or button. The satellite receiver must remain switched on till the time and during the duration of the programmed recording.
4 If you wish to use the VPS/PDC control, select the indication with the button then use the or button to activate VPS.
- means recording with VPS.
5 Store the recording data with the OK button.
- The »SHOWVIEW« table re-appears on the picture screen.
To programme further recordings, repeat the procedure from step 2, or end programming with step 6.
6 End programming with the » i INFO « button.
7 Press the TIMER ON/OFF button to switch the recorder to recording standby.
- The time is displayed on the recorder and the TIMER indicator is lit. The video recorder is in recording standby mode.
Help:
In order that the video recorder can carry out the programmed recording, it must be switched to recording standby with the « TIMER ON/OFF« button. The illuminated TIMER indicator « indicates this mode.
Programmed recording - by entering the data for the desired TV programme
Use this programmed recording mode if you do not know the ShowView numbers of the TV programmes.
Notes:
The time and date must correctly be set on the recorder.
If all programmed recording positions (TIMER positions) are occupied, you must clear one position, refer to "Clearing programmed recording data" on page 26.
Programming can be aborted at any time by pressing the button.
Preparation
Switch the TV set on.
Select the AV programme position for video playback on the TV set.
Insert a cassette with sufficient playing time and intact erase tab (cassette not erase-protected) into the cassette compartment until it is fully pulled in.
If a cassette is already inserted, switch on with the button.
If the recorder is in recording standby mode, de-activate this mode with the
TIMER ON/OFF< button.
Example
1 Start programming with the i INFO × button.
- The main menu appears on the picture screen.
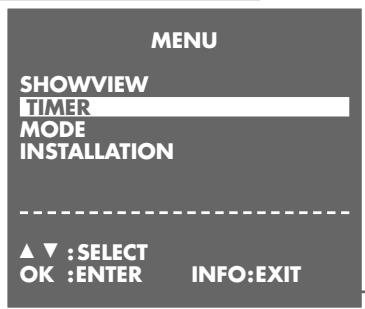
2 Use the or button to select the TIMER line then activate it with the OK button.
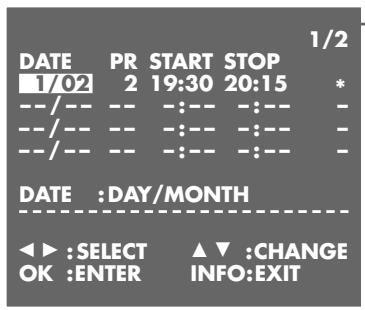
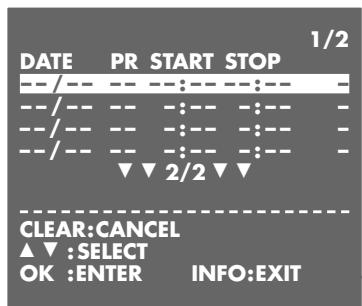
- The TIMER table appears on the picture screen.
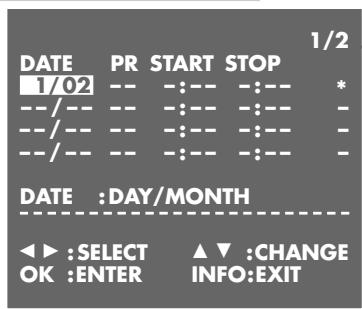
3 Select a free TIMER position using the or button.
4 Start the data entry with the OK< button.
- The current date is displayed.
5 Change the date (DATE) with or , or enter it with four digits using the 0 9 buttons.
Confirm with the OK< button.
6 If the programme is to be recorded "daily" or "weekly" at the same time, use the or button to select D (daily) or W (weekly).
- The "daily" function cannot be used for recordings on Saturdays or Sundays.
Confirm with the OK button.
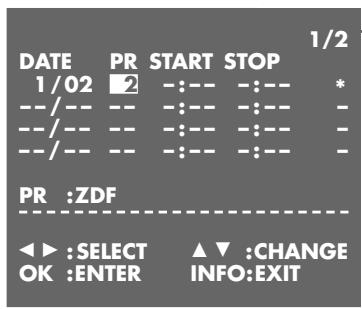
7 Change the programme position number (PR) with or , or enter it with two digits using the 0 9 buttons.
Confirm with the OK< button.
Note:
If you wish to record the picture/sound signal from an external device instead of the TV programme, you must select the programme position «A1 or A2 « using the «+« or «-» « button.
If you programme a recording from a satellite receiver not equipped with a SAT control socket, select the programme position A2 using the or button. The satellite receiver must remain switched on till the time and during the duration of the programmed recording.
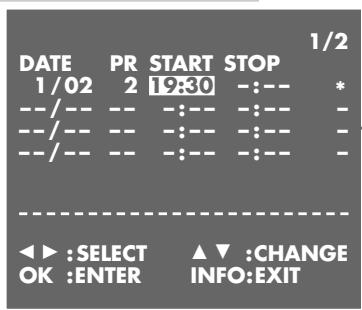
8 Change the switch-on time (START) with or , or enter it with four digits using the 0 ... 9 « buttons.
Confirm with the OK button.
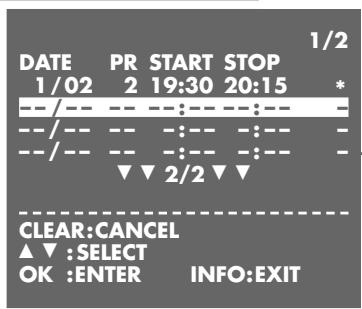
9 Change the switch-off time (STOP) with or , or enter it with four digits using the 0 ... 9 « buttons.
10 If you wish to use the VPS/PDC control, select the indication with the button then use the or button to activate VPS.
- means recording with VPS.
11 Store the recording data with the OK< button.
- The TIMER table re-appears on the picture screen.
- To programme further recordings, repeat the procedure from step 4, or end programming with step 12.
12 End programming with the «i INFO« button.
13 Press the TIMER ON/OFF button to switch the recorder to recording standby.
- The time is displayed on the recorder and the TIMER indicator is lit. The video recorder is in recording standby mode.
Help:
In order that the video recorder can carry out the programmed recording, it must be switched in the recording standby mode with the «TIMER ON/OFF« button. The illuminated TIMER indicator « indicates this mode.
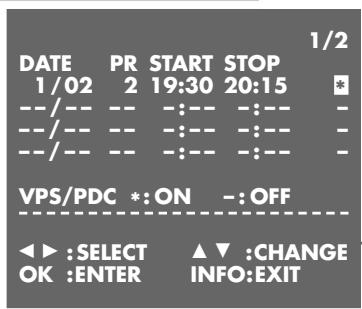
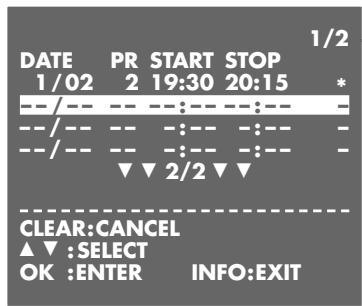
Checking, altering and clearing programmed recording data
Preparation
Switch the TV set on.
Select the AV programme position for video playback on the TV set.
Checking programmed recording data
If recording standby is activated, press the « TIMER ON/OFF« button.
2 Press the button.
- The video recorder is switched on.
3 Press the 1 INFO button to display the main menu.
4 Select the «TIMER« line using the « « or « « button then activate the function with the «OK« button.
- The TIMER table appears on the picture screen.
- Check the recording data.
5 Press the i INFO 已 button to exit the TIMER 已 table.
6 Press the TIMER ON/OFF button to switch the recorder to recording standby.
- The time is displayed on the recorder and the TIMER indicator is lit. The video recorder is in recording standby mode.
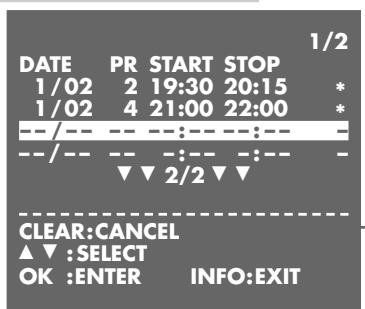
Altering recording data
1 If recording standby is activated, press the TIMER ON/OFF button.
2 Press the button.
- The video recorder is switched on.
3 Press the i INFO button to display the main menu.
4 Select the «TIMER« line using the «+« or «-« button then activate the function with the «OK« button.
- The TIMER table appears on the picture screen.
5 Select the TIMER position to be altered using the or button then activate it with the OK button.
6 Select the recording data to be altered using the or button then alter it with the or 9 < buttons.
7 Save the altered data with the OK button.
8 Press the i INFO button to exit the TIMER table.
9 Press the TIMER ON/OFF button to switch the recorder to recording standby.
- The time is displayed on the recorder and the TIMER indicator is lit. The video recorder is in recording standby mode.

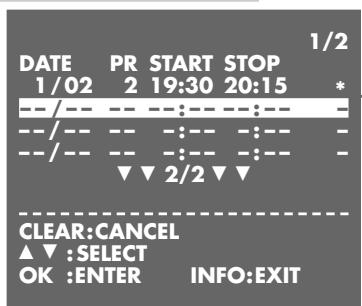
Clearing recording data
1 If recording standby is activated, press the TIMER ON/OFF button.
2 Press the button.
- The video recorder is switched on.
3 Press the i INFO button to display the main menu.
4 Select the TIMER line using the or button then activate the function with the OK button. - The TIMER table appears on the picture screen.
5 Select the TIMER position to be cleared using the or button then clear it using the CLEAR button.
6 Press the 1 INFO 已 button to exit the TIMER 已 table.
7 If several TIMER positions are programmed, switch the recorder to recording standby using the TIMER ON/OFF « button.
- The time is displayed on the recorder and the TIMER indicator is lit. The video recorder is in recording standby mode.
Interrupting the recording standby mode of the video recorder
This is necessary if you have programmed TIMER positions and wish to use the recorder while it is in recording standby mode.
1 Press the TIMER ON/OFF button.
2 Press the button to switch the recorder on.
3 Carry out the desired function.
Re-activating the recording standby mode of the video recorder
Insert a cassette with sufficient playing time and intact erase tab then press the « TIMER ON/OFF« button.
- The time is displayed on the recorder and the TIMER indicator is lit. The video recorder is in recording standby mode.
… from a second video recorder or a DVD player
Connecting the second video recorder or DVD player
Connect the «LINE2 (II) IN/DECODER« socket on this recorder with the corresponding socket on the other recorder or DVD player using a commercially available EURO-AV cable.
Preparation
Switch the TV set on.
Select the AV^ programme position for video playback on the TV set.
Insert the compact disc (CD) or cassette to be copied into the DVD player or playback recorder (source).
Insert a cassette with sufficient playing time and intact erase tab (not erase-protected) into the recording recorder (target).
Control
1 Select the programme position for the second recorder or the DVD player on the "target" recorder by repeatedly pressing the 0 button until the programme position R is indicated.
2 Start recording by pressing the RECORD button a longer time and at the same time start playback on the source unit.
3 End recording with the button.
Operation with a satellite receiver not equipped with a SAT control socket
Connection
1 Switch the TV set and the satellite receiver off.
2 Disconnect the video recorder from the mains socket.
3 Connect the EURO-AV (TV) socket on the satellite receiver and the AV2 socket on the TV set using a commercially available EURO-AV cable.
Note:
If the satellite receiver is equipped with an additional EURO-AV socket (DECODER) for a decoder, a "PAY-TV decoder" can be connected there.
4 Connect the «LINE2(II) IN/DECODER« socket on the video recorder with the corresponding EURO-AV SOCKET (VCR) on the satellite receiver using a commercially available EURO-AV cable.
5 Connect the «LINE1(I) IN/OUT« socket on the video recorder with the EURO-AV socket (AV1) on the TV set using the EURO-AV cable supplied.
6 Connect the aerial cable from the domestic aerial with the corresponding aerial socket () on the satellite receiver.
Connect the aerial cable from the satellite aerial with the corresponding aerial socket (INPUT-SAT) on the satellite receiver.
7 Connect the «ANTENNA IN« socket on the video recorder with the corresponding socket (TV) on the satellite receiver using a commercially available aerial cable.
8 Connect the aerial cable supplied with the «RF OUT« socket of the video recorder and the aerial socket (Y) of the TV set.
9 Reconnect the video recorder to the mains socket.
Preparation
Select the AV < programme position for video playback on the TV set.
Insert a cassette with sufficient playing time and intact erase tab (cassette not erase-protected) into the cassette compartment until it is fully pulled in.
Control
1 Switch the satellite receiver on and select the desired satellite programme.
2 Repeatedly press the 0 button until the programme position R2 is displayed on the video recorder.
3 Start recording by pressing the RECORD button a longer time.
4 End recording with the button.
Activating the decoder
If you wish to receive encrypted TV programmes from private broadcasters with your video recorder, you will require an appropriate decoder.
Consult a specialized dealer about the decoder.
Connection
Connect the «LINE2 (II) IN/DECODER« socket on the video recorder with the corresponding socket on the decoder using a commercially available EURO-AV cable.
Preparation
Switch the TV set on.
Select the AV^ programme position for video playback on the TV set.
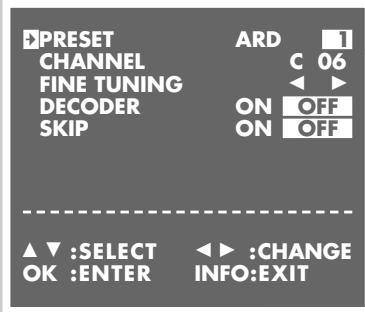
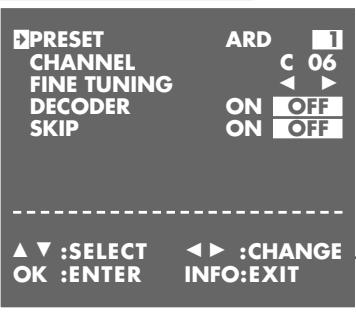
Adjusting a programme position for a decoder
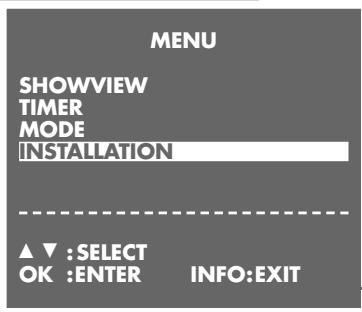
1 Call up the main menu using the i INFO` button.
2 Select the INSTALLATION line using the or button then activate it with the OK button.
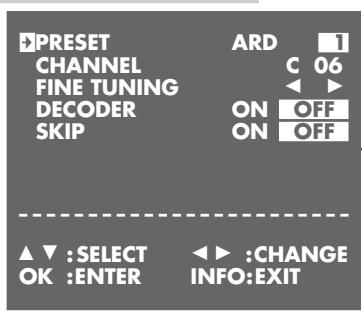
3 Select the CHANNEL PRESET line using the or button then activate it with the OK button.
4 Activate » MANUAL TUNING« with the «OK« button.
- The table for station programming appears on the picture screen. The «PRESET« line is marked.
5 Use the 0 ... 9 buttons to select the programme position on which the encrypted programme is received via the decoder.
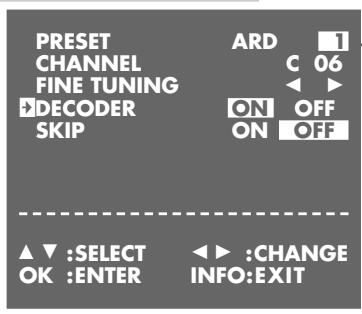
6 Select the DECODER line using the or button then use the or button to select ON .
7 Store the setting for this programme position with the OK< button.
8 End the setting with the i INFO` button.
Control
Switch the TV set on.
2 Before making a recording, select the programme position for the PAY-TV programme using the or or P or 0 9 buttons.
3 Start recording by pressing the RECORD button a longer time. - The PAY-TV programme is recorded.
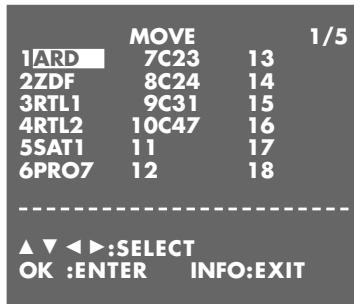
Re-sorting TV channels manually
Preparation
Switch the TV set on.
Select the AV^ programme position for video playback on the TV set.
Setting
1 Call up the main menu with the i INFO button.
- The »MENU« table appears on the picture screen.
2 Select the INSTALLATION line using the or button then activate it with the OK button.
- The INSTALLATION table appears on the picture screen.
3 Select the CHANNEL SORT line using the or button then activate it with the OK button.
- The CHANNEL SORT table appears on the picture screen.
4 Select the MOVE line using the or button then activate it with the OK button.
- On the picture screen appears the station table and in the background the picture of the selected programme position.
5 Select the channel to be moved using the buttons then mark it with the OK button.
6 Use the buttons to move the marked channel to the desired programme position then confirm with the OK button.
To sort further channels repeat the steps 5 and 6.
7 Press the 1 INFO 已 button to end the setting.
Clearing TV channels from the station table
Preparation
Switch the TV set on.
Select the AV programme position for video playback on the TV set.
Setting
1 Call up the main menu with the « i INFO« button.
- The MENU table appears on the picture screen.
2 Select the INSTALLATION « line using the » 心 or button then activate it with the OK « button.
- The INSTALLATION table appears on the picture screen.
3 Select the CHANNEL SORT line using the + or button then activate it with the OK button.
- The CHANNEL SORT table appears on the picture screen.
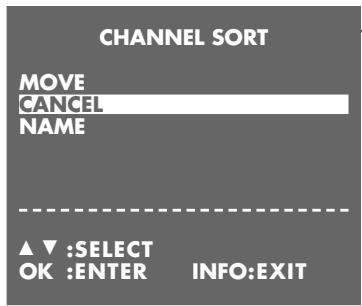
4 Select the CANCEL line using the or button then activate it with the OK button.
- On the picture screen appears the station table and in the background the picture of the selected programme position.
5 Select the channel to be cleared using the 10. The OK button.
6 Clear the TV channel with the OK button.
7 To clear further channels repeat the steps 5 and 6.
8 Press the 1 INFO button to end the setting.
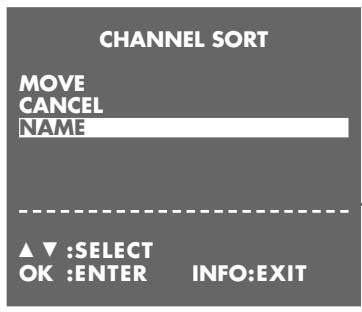
Changing or entering station names
Preparation
Switch the TV set on.
Select the AV^ programme position for video playback on the TV set.
Setting
1 Call up the main menu with the 1 INFO button.
- The MENU table appears on the picture screen.
2 Select the INSTALLATION line using the or button then activate it with the OK button.
- The INSTALLATION table appears on the picture screen.
3 Select the CHANNEL SORT line using the or button then activate it with the OK button.
- The CHANNEL SORT table appears on the picture screen.
4 Select the NAME line using the or button then activate it with the OK button.
- On the picture screen appears the station table and in the background the picture of the selected programme position.
5 Use the or button to select the TV channel for which you wish to enter a name then confirm with the OK button.
- The first position of the name is marked.
6 Use the or button to enter the desired character, use the or button to select the next position, then repeat these steps for the remaining positions (max. 5 positions).
Store the setting with the 0K button.
7 To assign further names repeat the steps 5 and 6.
8 Press the 1 INFO button to end the setting.
Channel programming with the manual tuning system or by entering the channel numbers manually
If you do not know the channel/special channel numbers of the TV stations you wish to programme, or if the recorder could not find a TV station with the help of the automatic tuning system, you can use the manual search for programming. If you know the channel/special channel numbers of the TV stations you wish to programme, you can enter this data also directly.
Preparation
Switch the TV set on.
Select the AV^ programme position for video playback on the TV set.
Setting
1 Call up the main menu with the i INFO` button.
2 Select the INSTALLATION line using the or button then activate it with the OK button.
3 Select the CHANNEL PRESET line using the or button then activate it with the OK button.
4 Activate the MANUAL TUNING line with the OK button.
- The table for channel programming appears on the picture screen.
The PRESET line is marked.
5 Use the 0 9 buttons to select the programme position on which the new TV channel is to be stored.
6 Select the CHANNEL line using the or button.
7 Start the channel search with the or button. - The channel search is stopped as soon as a TV channel is found,
or enter the channel number with two digits using the 0 9 buttons. Use the MONITOR button to toggle between normal channels (display: C ) or special/hyper channels (display: S ).
8 If finetuning is required, select the FINETUNING line with the or button then use the or button for finetuning.
9 Store the setting for this programme position with the OK< button. If you wish to programme further channels, repeat the steps 5 to 8.
10End channel programming with the i INFO` button.
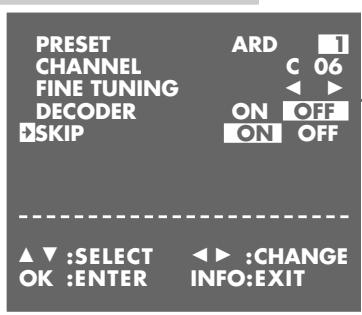
Skipping TV channels
Use this function if you wish to skip one ore more programme positions when selecting these step by step with the or button.
Preparation
Switch the TV set on.
Select the AV^ programme position for video playback on the TV set.
Setting
1 Call up the main menu with the » i INFO« button.
2 Select the INSTALLATION line using the or button then activate it with the OK button.
3 Select the CHANNEL PRESET line using the or button then activate it with the OK button.
4 Activate the MANUAL TUNING line with the OK button.
- The table for channel programming appears on the picture screen.
The PRESET line is marked.
5 Use the 0 9 buttons to select the programme position which is to be skipped.
6 Select the SKIP « line with the » « or » « button.
7 Select ON with the or button.
Note:
To make the programme positions available again, repeat the above steps but select OFF in step 7.
The digital clock of the recorder continues running for approximately 1 hour even when the recorder is disconnected from the mains.
However, the time is not visible in the display
Automatic updating
If a TV channel which has Teletext is set on programme position 1 of the recorder, the recorder takes over the time and updates automatically its internal clock. The recorder regularly repeats this update. This also means that the recorder will recognize the change from summer to winter time.
For updating the time and date, switch the video recorder off using the button.
Manual setting
Preparation
Switch the TV set on.
Select the AV^ programme position for video playback on the TV set.
Switch the video recorder on using the button.
| CLOCK | |||
| MODE | TIME | DATE | YEAR |
| 24H | 12:00 | 10/05 | 99* |
| MODE:24H/12H | |||
| ▲▼:SELECT OK :ENTER | ▲▼:CHANGE INFO:EXIT | ||
| CLOCK | |||
| MODE | TIME | DATE | YEAR |
| 24H | 12:00 | 10/05 | 99 * |
| ▲▼:SELECT | ▲▼:CHANGE | ||
| OK :ENTER | INFO:EXIT | ||
| CLOCK | |||
| MODE | TIME | DATE | YEAR |
| 24H | 12:00 | 10/05 | 99* |
| ▲▼:SELECT | ▲▼:CHANGE | ||
| OK:ENTER | INFO:EXIT | ||
Setting
1 Call up the main menu with the 1 INFO button.
2 Select the INSTALLATION line using the or button then activate it using the OK button.
3 Select the CLOCK line with the or button then activate it with the OK button.
- The «CLOCK« table appears on the picture screen, the «MODE« item is marked.
4 Use the or button to select the 12 hours ( » 12H ) or the 24 hours ( » 24H ) display mode.
5 Select TIME using the or button then set the time step by step with the or button, or enter it with four digits using the 0 ... 9 buttons.
6 Select DATE using the or button then set the date step by step with the or button, or enter it with four digits using the 0 ... 9 buttons.
7 Select YEAR using the or button then set the year step by step with the or button, enter it with two digits using the 0...9 buttons.
Note:
- The indication means automatic updating of the clock. To switch this function off, select the indication with the or button then switch it off with the or button.
8 Store the setting with the 0K button.
9 Press the i INFO` button to end the setting.
The functions "On-screen display on/off", "Continuous playback", "Selecting the video recorder's control address" and "Operation with a 16:9 format TV set" can be selected in the MODE menu.
Selecting the MODE menu
Switch the TV set on.
2 Select the AV programme position for video playback on the TV set.
3 Switch the video recorder on using the button.
4 Press i INFO to display the main menu. - The MENU appears on the picture screen.
5 Select the MODE line using the or button then activate it using the OK button. - The MODE menu appears on the picture screen.
6 Select the desired function from the «MODE« menu. For more information see the following chapters beginning with step 1 each.
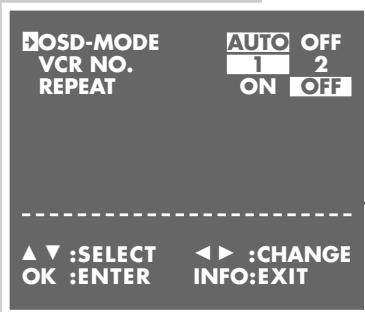

On-screen display on/off (OSD - On Screen Display)
1 Select the OSD MODE line with the or button.
2 Select OFF or AUTO with the or button then confirm with the OK button.
3 Press the 1 INFO 已 button to end the setting.
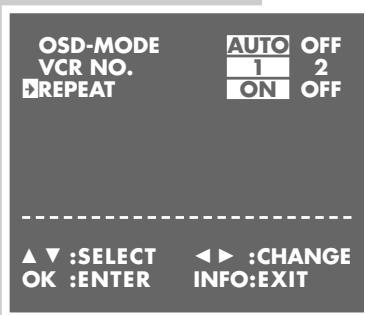
Continuous playback
When this function is activated, the video recorder winds the tape back automatically as soon as the tape end is reached and starts playback again.
1 Select the REPEAT line with the or button.
2 Select ON (or OFF) with the or button then confirm with the OK button.
3 Press the i INFO` button to end the setting.
Selecting the video recorder's control address
Your remote control can be used to operate different GRUNDIG video recorders independently of one another.
Ask your specialized dealer which GRUNDIG video recorders are suited. To ensure that the two video recorders do not disturb each other, the control address of the GV 900 must be changed.
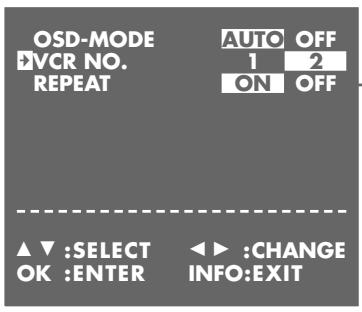
1 Select the VCR NO. line with the or button.
2 Select 2 (or 1 ) with the or button then confirm with the OK button.
3 Press the i INFO` button to end the setting.
- When selecting 2, the GV 900 is set to the remote control address 2. In order to control the GV 900 you now must press and hold down the «VIDEO 2« button while pressing the desired function button.
Child lock
The child lock allows you to lock all functions of the video recorder.
1 Press the button 3 seconds.
- The symbol flashes for 3 seconds on the video recorder's display then it remains illuminated. All functions of the video recorder are locked.
2 To de-activate the child lock, press the button 3 seconds.
- The symbol disappears from the video recorder's display.
With the video remote control you can also control GRUNDIG colour TV sets. The functions that can actually be operated depend, of course, on the technical features of your GRUNDIG TV set.
Note:
Point the remote control at the TV set.
Switches the remote control to TV control mode. Press and hold down the TV button while pressing the desired function button.
Switches the TV set to standby.
Direct channel selection,
0 selects the R programme positions.
In Teletext mode: entry of a three-digit page number.
Switches the display between programme position, channel number and special channel number.
Displays the „DIALOG CENTER" and switches in menu mode.
Volume control: - down, + up.
When in a menu: - cursor to the left, + cursor to the right.
Channel selection: + up, - down.
When in a menu: + cursor up, - cursor down.
Activates and changes functions, calls up, confirms and stores data.
Switches between Teletext mode and TV mode.
Sound on/off (mutefunction).
Displays the "Picture settings" menu.
In Teletext mode: previous page.
In Teletext mode: next page.
In Teletext mode: next chapter.
Displays the "Sound settings" menu.
In Teletext mode: next topic.
FIXING FAULTS YOURSELF
Not all picture and sound faults mean that there is a defect in your recorder. Disturbed reception can also be caused by a cable which is accidentally pulled out, a defect in the TV set, or failure of the transmitter or the TV aerial system.
| Fault | Cause | Remedy |
| No time indication on the recorder/the cassette is not pulled in. | Mains plug disconnected or poor contact. | Insert the mains plug or use a different mains supply socket. |
| The time display » 0:00« flashes on the video recorder. | Time and date not set on the video recorder. | Set time and date. |
| Recording of TV programmes not possible (only snow on the picture screen). | Aerial cable not connected. | Connect the aerial cable. |
| Channel to be recorded is not tuned in on the recorder. | Tune to channel. | |
| Failure of the TV transmitter or defective aerial system. | Check by selecting the channel to be recorded on the TV set, or ask your neighbour if s/he can receive this channel. | |
| Recording not possible. | The cassette is protected against new recording (tab removed). | Cover the opening at the back of the cassette with adhesive tape. |
| TIMER recording was not carried out. | Incorrect ShowView number or date. | |
| For VPS/PDC-programmed recordings, the VPS/PDC time was entered incorrectly. | ||
| After an interruption of the recording standby mode, the » TIMER ON/OFF« button has not been pressed. | ||
| Pour picture quality during playback. | The TV set is not correctly adjusted to the video recorder. | Correctly adjust the TV set to the video recorder (see page 12). |
| Incorrect track adjustment. | During playback adjust the picture to suit your taste with the »▲ « or »▼ « button | |
| The video heads are worn. | Contact your specialized dealer. | |
| Operation with the remote control is not possible. | The batteries in the remote control are exhausted. | Insert new batteries |
| The remote control is not pointed at the recorder. | Point the remote control at the video recorder. |
This video recorder complies with the VDE 0860 safety regulation and consequently also with the international safety specifications IEC 65 and CEE 1. This device complies with the requirements of the guidelines 89/336/ECC and 73/23/ECC.
TV standard: CCIR, PAL B/G, 625 lines
CCIR, MESEC B/G, 625 lines
System: VHS
Mains voltage: 230 V, 50 Hz
Weight: approx. 3.2kg
Power consumption:
- when recording: approx. 16 W
-instandby: ≤ 6.0W
- in energy-saver mode. ≤ 2.0W
Operating position: horizontal
Ambient temperature: +10^ C to +35^ C
Relative humidity: up to 80%
Fast forward time: with E 180 cassette:
typically 72 seconds
SAT control socket: Cinch
2 Euro-AV sockets: 21-pin (DIN/EN 50049)
Aerial input socket: coaxial B, 75 Ω input (DIN 45325)
Aerial output socket: coaxial S, 75 Ω output
GRUNDIG After Sales Points
GRUNDIG
Kundendienst Nord
Kolumbusstraße 14
D-22113 Hamburg
+49/40-73331-0
GRUNDIG
Kundendienst Mitte
Dudenstraße 45-53
D-68167 Mannheim
+49/6 21-33-76-70
GRUNDIG
Kundendienst Süd
Beuthener Straße 65
D-90471 Nurnberg
+49/9 11-7 03-0

GRUNDIG
Kundendienst West
Horbeller StraBe 19
D-50858 Köln
+49/22 34-95 81-2 51
GRUNDIG BELUX N.V.
Deltapark, Weihoek 3, Unit 3G
B-1930 Zaventem
+32/2-7 16 04 00
GRUNDIG UK LTD.
Elstree Way, Borehamwood, Herts, WD6 1RX
Unit 35, Woodside Park, Wood Street
Rugby, Warwickshire, CV21 2NP
2 Waverley Office Park, Old Naas Road
EIR Dublin 12
+353/1-4509717
GRUNDIG FRANCE S.A.
- Videorecorder GV 900 SV/1
- Installation and Safety
- At a Glance
- Connecting and Preparation
- Settings
- Playback
- Recording
- Copying
- Operation with a Satellite Receiver
- Operation with a Decoder
- Special Settings
- Setting the Time and Date
- Special Functions
- Remote Control of TV Sets
- Fixing Faults Yourself
- Technical Data
- Help in the Case of a Defect
- Special features of your video recorder
- Three recording options
- High-speed drive
- GRUNDIG Megalogic
- ShowView recording
- SAT video control
- Contents of delivery
- Rear side of the video recorder
- The remote control
- Notes:
- Connecting the aerial, TV set, satellite receiver and mains cable
- Note:
- Attention:
- Switching the video recorder on and off (energy-saver mode)
- Inserting batteries into the remote control
- Environmental protection
- Adjusting the TV set to the video recorder
- Preparation
- Adjustment
- Channel programming with the automatic tuning system ATS euro plus
- Programming
- Help:
- Basic playback functions
- Additional playback functions
- Double playback speed
- Slow motion
- Advancing freeze-frames step by step
- Improving the picture of a freeze-frame
- Correcting picture interference (track adjustment)
- Automatic picture improvement (ACC Plus)
- Playing back NTSC colour recordings
- Index search
- Control
- The three recording options
- The video programme system (VPS/PDC)
- Notes on the video programme system
- TV programmes without VPS/PDC signal
- Programming several TV programmes on one day
- TV programmes from a satellite receiver with aerial positioner
- Instant recording
- Assembling recordings with clean joints
- Locating certain recordings using the Video Index Search System (VISS)
- Programmed recording - by entering the ShowView number
- Example
- Programmed recording - by entering the data for the desired TV programme
- Checking, altering and clearing programmed recording data
- Checking programmed recording data
- Altering recording data
- Clearing recording data
- Interrupting the recording standby mode of the video recorder
- Re-activating the recording standby mode of the video recorder
- … from a second video recorder or a DVD player
- Connecting the second video recorder or DVD player
- Operation with a satellite receiver not equipped with a SAT control socket
- Connection
- Activating the decoder
- Adjusting a programme position for a decoder
- Re-sorting TV channels manually
- Setting
- Clearing TV channels from the station table
- Changing or entering station names
- Channel programming with the manual tuning system or by entering the channel numbers manually
- Skipping TV channels
- Automatic updating
- Manual setting
- Selecting the MODE menu
- On-screen display on/off (OSD - On Screen Display)
- Continuous playback
- Selecting the video recorder's control address
- Child lock
- GRUNDIG After Sales Points
Brand : GRUNDIG
Model : GV 900 SV/1
Category : VCR